Vauxhall Owners Forum banner

Corsa Rally Car

84K views 131 replies 39 participants last post by  Gary B  
#1 ·
Thought I'd post my project up here with the other corsa rally cars that are being built at the moment.
It's nothing revolutionary and not as exotic as some of the others but it may be of interest to some, as the other projects are to me.

I've fully seam welded the shell and plated where required, and welded in a Harry Hockley cage. The plan is to build the car up prior to blasting and painting it, using some stuff of the present car and some new.


Present car:
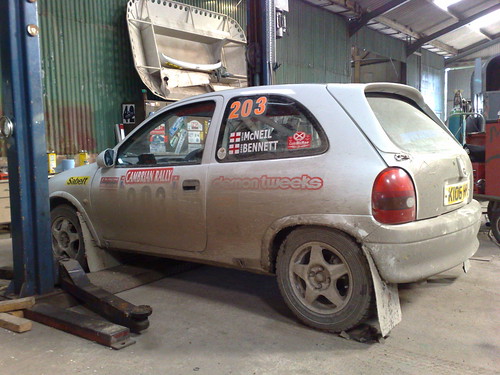
Image


New car:

Image


Stripped and seam welding started:

Image


Seam welding complete and cage started:
Image


Image


Image


Image


Cage complete and non sunroof fitted back on with Sikaflex and a few spotwelds:

Image


Dashboard fitted re-fitted after notching out around cage:

Image
 
#2 ·
Plated around the rear rear suspension pick up points and the chasis rail at the front pick up points. The rears take quite a battering in the forests and the fronts seem to be a week point.

Image


Image


Also fitted the cill stand tubes. put a hole all the way through the cill with a hole saw, pushed the tube through then welded a plate to both sides. We used axle stands at aervice for a couple of seasons, then when we got the present car it came with the cill stands which make it much easier.

Image


Image


Started stripping the old car:

Image


Took off the rear beam and suspension, front suspension, guards, radiator, pedal box, exhaust, tank, seats ready for fitting to the new car. Dropped the F13 diff out ready for ebay. Going to be using an F20 diff with grp a shafts and hubs in the new car as hopefully will have some more power out of the new engine.
 
#3 ·
only just seen this! looking good, get more pics of your chassis strengthening up please, im about to do this to mine, ive got it all worked out in my head but some extra inspiration wont go amiss.

what diff are you going to be selling? i may be interested if its a decent one for decent money ;)

and also good work with the welding, all looks pretty neat and tidy!
 
#7 ·
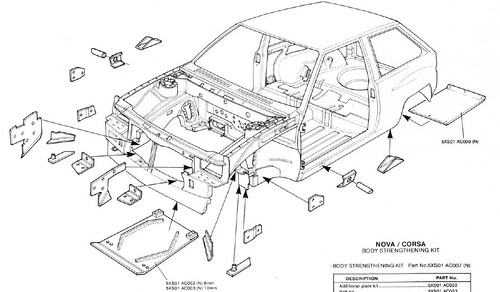
The strengthening is pretty much as per the GM nova manual. I bought a plating kit off Protec and used it on the corsa. Most of it can be used/fits, with a little tweeking.

Image


I also plated over the rear beam mount and took a tube to it from the cage on the inside of the car:

Image


Image


The diff is a F13/15 TranX with 45deg ramps. It came with the old car when we got it and it's been fine. Before the last event it was stripped and checked, then fitted with a new plate kit and spring plate. Were changing to an F20 due to the increase in power. Let me know if you're interested.


Been busy with work this week so not progressed much. Stripping old car and started putting stuff into new shell before it gets painted and the components we're re-using get stripped/serviced. Want to make sure everything fits and I've not missed anything first.

Image


Image


Image
 
#8 ·
Nice work so far, takes an age prepping a shell. One thing to consider is a harness bar in between the rear suspension mounts as i found the ones supplied in the kit sit slighty to high for the belts. Pretty sure its in the blue book but the belts are to be level or angled down over.

Kee pup the good work and nice to see another rally car on Migweb:nod:
 
#10 ·
You think the weldings complete then you find another 6 jobs...


I shortened the 2 harness bars so they would sit lower. I'm hoping it's enough but will see when the seats go in. You can have the shoulder straps sloping up by 10deg (according to blue book) but would prefer them to slope down.

The dust caps are just pushed in but the VW are really tight in comparrison to the Vauxhall ones. They stayed put all last season on gravel.
 
#15 ·
Cheers.
The cage in the old shell is a weld in cage so will have to go with the shell. That will get sold or used as a scrap bin in the workshop. Depends what it's like once stripped.
 
#13 ·
VW caps it is then ive got mine bolted through the middle which does the job but its a pain.

Im sure the problem i had was the racer stuck out to much so there was nothing for it to tighten into, did you use Vaux rear bearing or VW?
 
#14 ·
Rallycorsa

Im sure the problem i had was the racer stuck out to much so there was nothing for it to tighten into, did you use Vaux rear bearing or VW?
It's a Volkswagon bearing on the rear and the cap fits nice and tight. Can't remember how far in it pushes in, I'll have a look.

Deeky
Re: Corsa Rally Car
Nice work where you rally it about?
Thanks.
We've been competeing in the BTRDA forest rally championship for the last 3 years. The events are mainly in wales, with one in the lake district and one near nottingham. We've been quite succesful over that time (2 championship wins, and a 2nd place in the championship) and are hoping to contest the BRC challenge this year but with only 4 weeks to go we are likely to miss the 1st event.
Probably end up doing a few events from each championship this year and have a go at a full championship next year.
 
#17 ·
Got the car lifted off the spit and onto some wheels.

Image


Image


Image


Fitted the seat rails now that the car is sat level, and plated the tunnel to reinforce and level up where the hydraulic handbrake will mount. Harness eyes fitted too.

Image


Cut and welded in place a mounting ring with captive nuts for the filler cap.

Image


Image


Reinforced where the bonnet pins and tailgat pins will be

Image
Image


The layout/position of things are going to be slightly different in the new car so fitted the drivers seat and my seat fitted so we can see where the upright hydraulic handbrake wants to be, and also other things like footbrace, extinguishers, line/wiring routes etc.

Image


I'm enjoying building the car but having missed 2 rallies we would normally do, finally sitting in the car in the seat provided some welcome motivation, even in the condition the car's presently at!
 
#19 ·
Brilliant bit of strengthening and cage work and your welding is the best I have seen anywhere, I like the stands you are using to tip the car on its sides to get to underside hassle free and do a proper welding without gravity effecting the flow, and easy access, that is how I see my Manta being restored properly rather than welding from underneath, I have been looking to get a garage where I can tip the car on its side or use special stands to do the underside properly without leaving any metal work uncovered.

Good luck on your ambitious project and I hope you win many rallies against some of the best out there.
 
#21 ·
Thanks for the positive comments everyone.

We've made a bit more progress getting the car put together.
Got the batttery mounted behind my seat. Had to weld a small fin in place to form a flat surface for the battery tray to mount to.

Image


Got the washer bottle mounted, the cage triangulation stops it going back in exactly the original position. Mounted the expansion tank, the original mounting was on the scuttle which was removed to give room and clearance for theTBs. Fitted a mount for the isolator and extinguisher T handles. Also got part of the revised heater air intake pipe fitted.

Image


Image


Set abaout lightening the doors. We weighed a standard door which was over 36kg, the lightened one is 13.5kg.

Image


Started fitting aluminium panels to the dashboard ready for the instruments, switches, fuses etc to mount to (they won't be staying silver!).

Image


Image


Image


Getting to the point we need the engine back so we can start routing wiring and fuel lines etc.
 
#26 ·
Just back from being away on holiday for a bit so the car hasn't progressed over the past few weeks but Pete has made a start with the loom.
Stripped out what isn't needed from an original loom such as wires to original instruments, engine & management, headlight adjusters, fuses/relays, connectors etc., etc.

Image


Next step is to fit it into the dash along with the new switches and fuses etc and have connectors ready for the front and rear looms.

Instrumentation will be by this:

Image


Also whilst I was away, the 1400 engine was finished and picked up from Protec:


Image


Image


Image


Don't know the full spec yet but she was into the 180s on the dyno.:) It will be interesting to see what power remains once in the car.


Also collected at the same time were the manifold and the massivveeee shafts:

Image
Image


Hopefully finish work on the shell this weekend (engine mounts, slam panel and a few other bits) then get it off for blasting and painting.
 
#27 ·
Looking good, really like my Racetech dash very neat and tidy.

Engine looks like a Bill Falconer motor if it is you wont be dissapointed. Just one daft thing alloy sump ive had one crack and so has a mate of mine, we now have steel 1400 sump which is baffeld as standard, i assume because you have a welded boss on the sump your also using Protec breather?
 
#29 ·
Looking good, really like my Racetech dash very neat and tidy.

Engine looks like a Bill Falconer motor if it is you wont be dissapointed. Just one daft thing alloy sump ive had one crack and so has a mate of mine, we now have steel 1400 sump which is baffeld as standard, i assume because you have a welded boss on the sump your also using Protec breather?

Yeah, using the Protec breather, by all accounts a necessity when you start pushing these engines. The engine was built by them too. Looked at Bill Falconer but we went with Protec, no reason really just that we use Alan for pretty much everything else and the service is always spot on. Never heard a bad word for Bill Falconer though either, unlike some of the horror stories you hear about some of the larger engine builders.
Always preferred a steel sump as it bends rather than cracks if impacted, don't know the reasoning behind the alloy sump, I'll ask him! Out of interest what caused the cracks?

The dash is a great solution and when you price up seperate instruments it's similar money, plus it does so much more and looks great. Good back up service with it too. Linking it to the MBE.
Anything I need to look out for with it?


kennybarbour
Re: Corsa Rally Car
engine looks nice, good idea with the spring on the dipstick, that'll be getting copied!!! as will the stand if my engine doesnt come with one. 180 sound excellent but i wouldnt fancy the bill...

how much were the shafts just out of interest? that'll be the next upgrade on my agenda after car is build, shafts hubs and bigger diff.
The engine was for free, it came with a really expensive stand and spring...lmao
Good little added touches though, proper service.

I think the shafts were ÂŁ350ish each, plus the hub machining and bearings (ÂŁ100ish each I think), F20 drive flanges (got for a few beers) and F20 diff. Plus you want a couple of spare shafts! We used to break shafts on a standard 1400 with no diff. so would do well to even finish a stage without doing it now. When you're spending ÂŁ450 on event entry fees alone and trying to win championships it's a wise investment. Though I wonder how long our F13 box will last....:doh: